It can be daunting to start training for cycling indoors. While there are many pricey trainers, accessories and programs available, one can easily find the perfect setup with the right knowledge. This article will help you identify your needs and get you up and pedaling quickly.
Generally speaking, as you pay a higher price, the trainer itself will become quieter and offer a higher resistance ceiling, making it more efficient and durable.
We already have an article on how to choose between different models, but here is a quick rundown of different categories :
Direct Drive Trainers: The most efficient and quietest option available. Best for enthusiasts and serious cyclists who will train 3 times or more per week, they offer the best indoor experience, focusing mostly on realism and powerful resistance. They allow power and cadence measurements and are getting more affordable every year. If you are on the fence, we definitely suggest going for the direct drive option!
Smart Wheel-on trainers: A great introduction to interactive training. They offer a solid taste of the available programs and benefits associated with structured training, without breaking the bank. The wheel-on design requires regular calibration and the use of a trainer-specific tire.
Basic Wheel-On Trainers: The more budget-oriented choice, they are often a little louder and offer a lower resistance ceiling. While not integrated within the trainer itself, it is possible to pair with speed and cadence sensors for connectivity with a third-party application – this helps keep the price way down.


Interactive VS Smart Trainers
Modern trainers offer wireless connectivity with different programs such as virtual worlds (Zwift, Rouvy), structured workout programs (Trainerroad, SufferFest) and others, for a more enjoyable indoor experience. This is true of most models on the market today – however, there is an important distinction to be made :
Interactive trainers: Are typically what we think of when we speak of indoor training programs. They offer the most realistic riding experience thanks to automated gradient and resistance changes to mimic that of a virtual world of pre programmed workout,
Smart Trainers: Allow for display of riding information such as power, speed, cadence and heart rate, yet offer no automated resistance changes. In most cases, resistance must be adjusted manually according to the program’s prescription.
Getting started
Now that you’ve chosen your trainer, it’s time to set everything up.
Hardware
Wheel-on Trainers: You will need a trainer specific tire to minimise friction and wear on your outdoor tires. In some cases, you will also need a Thru-Axle adapter for your bike – check with one of our salesmen to confirm compatibility.
Direct Drive Trainers: While some trainers include a cassette, you might need to change/install one depending on number of speeds and preferred ratios. You can either purchase a cassette tool and use your own cassette, or simply purchase a second cassette.
Connectivity
Trainers use either ANT+ or BLE (Bluetooth) to transmit data. If you plan on using any type of mobile device (phone/tablet) or Apple product (Macbook, Apple TV, iPad or Iphone), the trainer will pair directly with your device.
To use a PC computer, you will require a separate antenna to pair your trainer with the computer, such as the infamous Tacx Antenna.
Training software
Many companies have their own training software. For Example, Tacx’s iOS training software is perfect to get started. However, the free version does not include any visual stimulation, and will only display ride information in real time.
Zwift: The most popular application is most definitely Zwift, which is a video-game-like virtual world, in which you are free to ride wherever and whenever you like. It is an online software, which means you can ride with other cyclists and friends, in real time. It also has a whole host of different maps and events to keep you entertained throughout your winter training.
To learn more about Zwift and how to get started, check out our article here :
Trainerroad: Another popular option, Trainerroad focuses on high quality training programs, for all types of athletes and goals. The company works with high quality coaches to create yearly structured plans for Road, MTB and triathlon. Trainerroad is also compatible with most GPS units nowadays, meaning you can also take your training outdoors and stay on track.
Training space
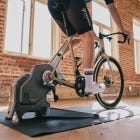
It is essential to have a space that will motivate you to get on your bike and pedal hard. We recommend a dedicated training room, or at least a space, where temperature is cool all year round, well lit, spacious and ideally not carpeted. A mat under your trainer will be ideal to collect sweat and protect the floor from the movements and vibrations of the trainer itself.
One other thing to consider is noise. Even with the most quiet trainers, gear shifts and fans are quite noisy and the fear of waking somebody or bothering neighbours shouldn’t be a hindrance to training.
Accessories
Ventilation is a key part to monitoring room and body temperature. Most indoor trainer manufacturers offer fans. Some are connected to a heart rate sensor or the training app to simulate wind or adjust according to your effort level, providing superior comfort.
A small table in front of your bike will allow you to keep everything within reach, such as a towel, your phone, and snacks. Several models are offered by most manufacturers.
This table will also allow you to set up your laptop/tablet while you ride, or you can also have everything projected onto a larger TV if you have the space/budget for a dedicated TV screen.
We hope this helps you to get started as soon as possible, as winter is coming. If you have any other questions or want to know more about the different models we have in stock, visit us in store or give us a call at 514-666-0695.


